|
My quest to document the chronology of the 'Journeying With The Totems' series, a task that gets harder to do as time goes by, got more complicated today when I discovered that all my Facebook posts pre-December 2014 were gone! Thank you Facebook! This, on top of my hard drive crash earlier in the year where I lost a year and a half of files and emails... So I began the process of looking through old website files and available emails to decipher the date sequence of the paintings. I couldn't depend on my JPEGs as so many have been copied and recopied for various purposes and so the dates were all over the place. I'm glad that I took the day to sort this as I had a few paintings out of sequence in my mind. I needed to have a clear timeline as I prepare my Journal series with the background on each painting. The sequence is important as each painting was the base that led to the one that followed. So here is a chronology which I've now deem 'official'. :-) 
0 Comments
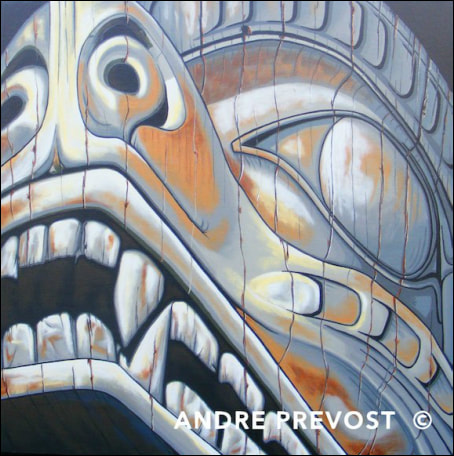 Grizzly #1, 2013 24” x 24” x 1.5” (First study of a pair: in grey) From Kwakwaka'wakw Bear Pole at Swartz Bay Ferry Terminal. Carved by Kwakwaka'wakw artist, Chief Henry Hunt First of a pair with Grizzly #2. After completing the Kunghit painting, I needed to take lessons learned in the first two and tackle more complexity and delve further in the development of colour, both within the aging wood and the pigments (which the carvers had added). I also wanted to choose a subject matter that best suited a square canvas. I liked the symmetry of a square shape. Once I had selected the Grizzly section from the totem at the Swartz Bay Ferry terminal, I spent some time studying the image. I liked the angular position of the Grizzly’s head, but given that it is an indoor totem, the picture I took during a regular rainy day was fairly dark. Once having selected the dark gray base for the canvas, and painting the sides black (to get rid of any trace of the primed white canvas), I drafted the image onto the canvas in the usual graphing technique. I decided to use black for the upper background corners and for all shadowed areas within the carved face. From there I began developing the gray tones. This brings up a part of the process that has become intrinsic to my process. After getting a laser colour photocopy of the image for colour accuracy, and with the superimposed graph pattern, it becomes my master reference from that point on. As I make a colour choice, and once applied and dried, I will often sit with the painting and the original image, to study the correctness of the colour, and if not correct, why. The world of grays is a complex one. There is no such thing as just the colour gray. There is brownish grays, blue grays, lavender grays, greenish grays, etc. And once the paint dries, and in relation to the other colours around it, corrections are often needed. The relationship of colours against other colours is always interesting to me. For example, you can use the exact same colour on two opposing ends of the canvas but because of the colours in between, it looks like you have used two different grays. With this totem study, I began developing more subtle details and layers for the wood. An example would be the teeth. I also reduced the amount of crack lines, keeping the more prominent cracks with the totem and using lighter colours to suggest the others. Different from the Kunghit painting, I also began using a brighter shading to bring out the bright spots on the totem, and to assist its form. The crucial design elements in addition to the upward focus of the totem, were the strength of the nostrils and mouth, and the carving of the upward looking eye. I loved working on this piece, and I was completing it, I felt the need to continue with this image, but try a different approach. SOLD Tim and Monique Mymryk, Winnipeg MB Link to Swartz Bay Terminal Totem Pole:
http://victoriadailyphoto.blogspot.ca/2011/01/kwakwakawakw-bear-pole.html 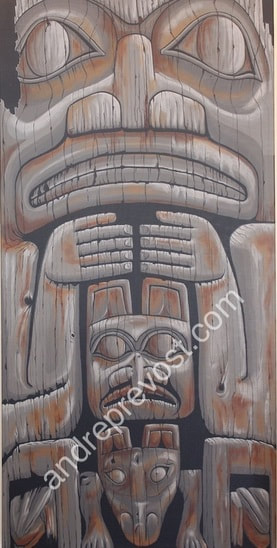 Kunghit House Totem, 2013 18” x 36” x 1.5” Acrylic on exhibition canvas From 1850 Interior House Pole inside house called ‘Raven House’ belonging to he lineage of the ‘Sand Town People’ of Raven Moiety of Kunghit Haida. Haida Gwaii: Kungkit Depicts Human with unknown creature beneath hands and a bear cub between the ears of the bear below. ____________________________________ Having completed the first Totem Duo painting, I was still tentative in my new venture in this series, and wondered what that next image could be. While looking through my library of images, which were primarily from the UBC MOA collection, I was conscious of my early discoveries and of the fact that I was still learning my new technique. I was also limited within my library in that the lighting for the indoor collection brings out the gray cast of the old wood and my camera could not pick up the hint of the undertones (even if the human eye could see them). I was also unwilling to chance ‘interpreting’ what that could be based on my priority to stay faithful to the totems and what was actually there on the surface. So I decided to go with the Kunghit House Totem piece as its features and textures intrigued me. My picture was naturally dark given that this piece is in the center of the museum and away from the wall of windows to the north. I chose a dark gray base colour to block out the white of the canvas and did the shadows and top sections (where the wood had fallen away) in a dark gray/black. One other technique which I forgot to mention in the Totem Duo background is that I continue to use the most basic of algebra formulas (that I served my well all these years) to determine the ratio of which images fit available canvas sizes, or telling how I needed to crop the jpeg. Works perfectly every time. If your canvas is 18” x 36” like the Kunghit canvas and your jpeg Is 12cm x 36cm, to calculate how much of the jpeg you can use: If: 18 = 36 12 = x 12 X 36 ÷ 18 = 24
Note: I use metric measurements for the jpegs as it gives me a more precise way of measuring. After painting the base colour of the canvas, I then plot out the standard grid pattern on the jpeg print, followed by drawing out the same grid on the canvas in a light grey (hard lead). Then the work begins in transferring the enlarged image on the canvas. Accuracy is important in my work, as the First Nations motifs are very distinct. Now the painting challenge was to take the lessons learned from the first painting and continue the evolution. You will note that in this one, I was experimenting with the heavily cracked wood and age of the totem. The use of lines for cracks was more extensive but even though the painting was dramatic, I felt that I would need to develop that concept further as I progressed. I needed to develop how a crack is not just a line but everything else that the wood is doing around it. I also started experimenting with added a bit more colour with my finger painting technique. Even though the jpeg was dark and gray, having seen the actual totem numerous times, I could see faint undertones in the jpeg, and I wanted to bring them out carefully. Less is more. So in the end, I could see a marked change from the first painting, and it was time to move on to the next. Link to MOA UBC webpage for this Totem:
http://collection-online.moa.ubc.ca/collection-online/search/item?keywords=Kunghit+House+Totem&yearstart=&yearend=&row=6 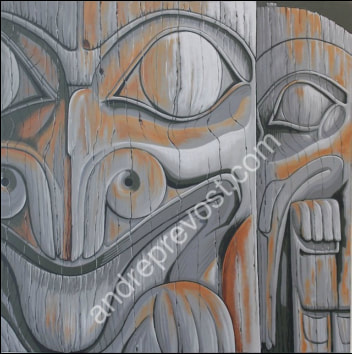 My son encouraged me to do a series of Journal entries focused on each painting, giving some background and my thoughts while painting each. It is a wise recommendation as, with time, the details and memories blur. So I will attempt to prepare the Journal entries in the sequence that the series progressed. Some have been purchased and many are still available in my For Sale page. I welcome questions or remarks along the way.
Totem Duo, 2013 (the 1st painting of the series) 24” x 24” x 1.5” Acrylic on Exhibition Canvas Sections from a House Frontal Totem Pole which once stood before a dwelling named 'Plenty of Ilimen-Hides in this House.' It belonged to an Indian clan named 'Those Born at Qadasgo Creek.' UBC MOA (Left: Grizzly Bear / Centre: Cormorant / Right: Eagle) Once having thought through my intent and the possibility of venturing into paintings based on the major totems of the West Coast, the big question was ‘Which one’ and what technique would I use. I had also determined that I wasn’t interested in doing landscapes depicting totems, but rather, zero in on facets of the totems, like facets in a cut gem. I was well acquainted with the wonderful collection at the UBC MOA, and had visited it frequently through the years. I’ve always had a special fondness for the sections of the House Frontal Totem Pole in the Indoor Collection, so I decided to do a tight focus which included the 2 sections of the Grizzly Bear and the Cormorant, one behind the other. I had also decided that I wanted to develop the series on exhibition canvas, because of its look and I wanted to avoid framing as it detracted from the totems. Starting with that blank white canvas was daunting, but once I chose the gray base colour for the canvas, given that I was venturing in completely new territory, I placed my faith in the image that I had. I would let it guide me, through the errors and the discoveries. That became the core priority throughout the series – letting each image guide the process. That is why, even though it is a series about totems, each totem painting is totally different for the ones prior or those to follow. A quick note on the base colour that you chose to begin with – it will determine your colour choices up until you complete the painting. That is why, if I did a copy of the same painting, it would not, could not ever be the same as the first. It will be its own journey and variations of colours. Very quickly, the first problem was that I didn’t like the brush strokes as it was adding a texture, which wasn’t on the totems themselves. Also, it didn’t adequately depict the subtle shades of the wood’s undertones as it ages. I experimented with a few methods and found that it was best to abandon the brushes, other then a regular round brush to apply some paint and a fine script brush for lines and cracking in the wood. Everything else was done with my fingers. It permitted applying very thin layers of colour, which would come through successive layers. I was surprised how quickly my new technique developed. I was also taken by how tactile the technique was, with the sense of touch on the canvas being surprisingly similar to feeling the wood of the totem. In this first painting, the colour highlights were still pretty basic. I allowed myself to complete that journey in this form, knowing that it would inform the next painting. It was teaching me in my newly discovered technique and preparing me to continue my discoveries on the next. On this Thanksgiving weekend, my son and I are on another major threshold. I finally got the all clear to proceed with the sale of my condo and relocating to Vancouver Island. We hadn't started anything for the past month, afraid to jinx the process. So now the crunch is on and so much to do, but this will not be the first complex move in our lives. I can't see it being as bad as the last move in 2011.
So, before the realtor can set up our listing, we first need to 'try' and stage the condo as a regular condo, complete with living room, dining space etc. What you say? Well, since my son joined me, his bedroom was the living room, the dining area and den became my studio and my bedroom, well, became office, storage, my living space and where I slept. That being said, every available nook and cranny is crammed with both our belongings. The process to get the condo will have its hurdles but in the end, it will all be worth it as we will then be in a good living arrangement and with studio/work spaces for each of us. We both also feel strongly drawn to the art community and First Nations communities on the Island. So one day at a time. Oh, and if you'd like to help this family with its transition, you can do some window shopping during my Fall Sale on the 'Buy Now' tab above (which ends on Oct. 22nd). ;-) Regards to all.
Firstly, the first 'Fall Sale' purchase came through yesterday for both the 'Beaver Totem With Moss' and the 'Theotokos icon'. The timing was perfect, and after a successful meeting with the bank yesterday, a few more sales will greatly help the next phase in my studio work.
The bank gave me the go ahead to get my current condo on the market and begin the search in earnest for a new home on Vancouver Island. For the past few years, once my son joined me in North Vancouver because of his disability, we made due with the wee condo space, and it is fortunate that we get along so well. But even so, we have both reached the breaking point where we need better living space, he needs a place to rehearse his music and singing, and my studio is such where it limits what I can do. It is still possible to purchase a home in one of the smaller communities on the Island which would greatly improve our living arrangement and provide far better studio and workshop space for myself and my son. But we need to move on that now! As his father, it is my best and only way in which I can support him in his disability, always in the hope that he will in due time find his own path. So with two weeks left in the sale, I am hoping that some of you will take advantage of the great savings, including free shipping within Canada. It greatly supports this artist in the development of his work, both with the Totem series and in his iconography, and wherever the art leads to. The Island also has a wonderful art community and strong First Nations communities, both which this artist wants to be connected to and develop through that inspiration. |

Archives
November 2020
|
 RSS Feed